The Spreadsheet View (Mitigations) page allows the user to add, edit, delete, and export mitigations in a selected project. This page is visible only to those users who have Read/Write access or View access for the page Spreadsheet View (Mitigations). Users with Read/Write access can create new mitigations, edit mitigations, delete mitigations and export to Excel. Users designated with View access can view the mitigation details and export to Excel. The mitigation details in the Spreadsheet View (Mitigations) page are displayed in ascending order of the Mitigation Risk Score.
This is a special component that has an Auto Save feature. When editing or adding new values to a cell, the value is automatically saved by clicking, another cell. It is important to always click in another cell to trigger this auto save feature. The values in the spreadsheet can be sorted by clicking on the column header. Click again on the column header to reverse the order of sorting. The columns can be resized by clicking and dragging between the column headers. Each column has its own minimum width set. A column cannot be dragged narrower than its minimum width.
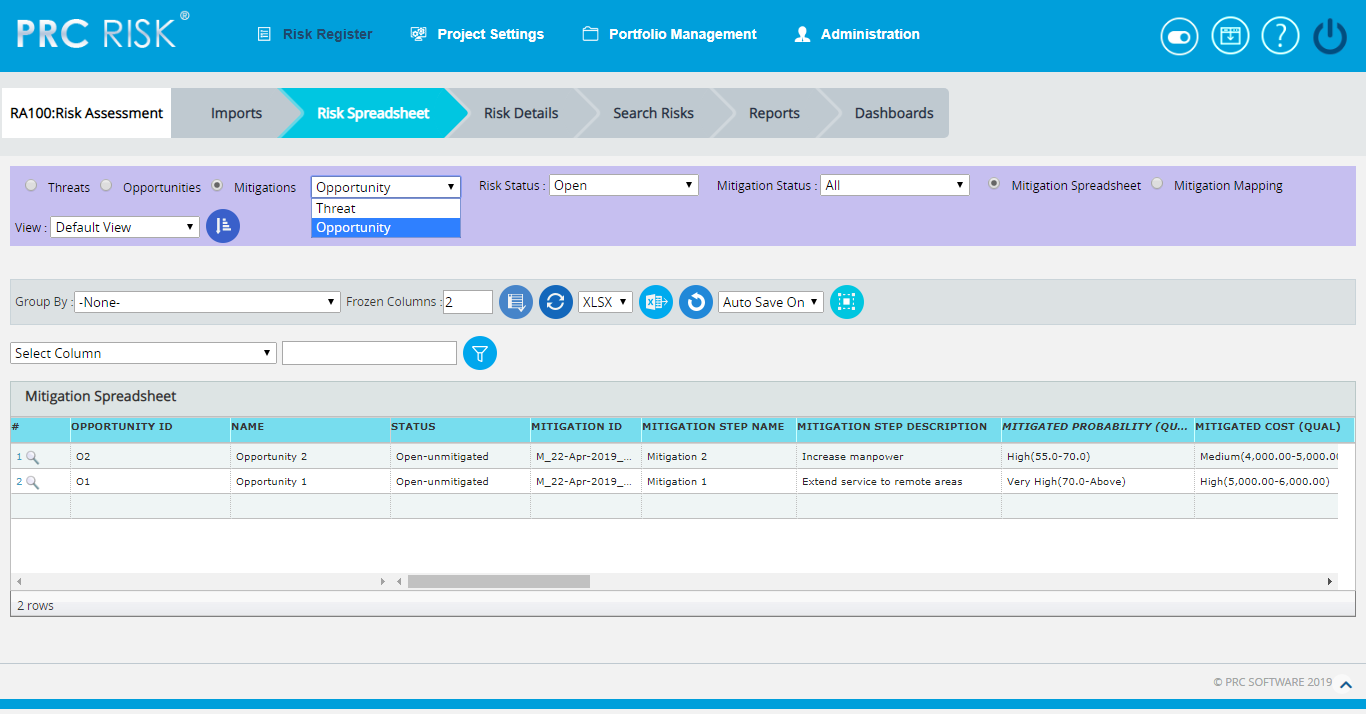
Figure 1
Drill Down:
The drill down option is available to the user at the first column of mitigation spreadsheet. (Figure 1) The user can drill to the risk details mitigation page when the Drill Icon corresponding to each mitigation is clicked there the detailed information of the corresponding mitigation can be viewed.
Navigate Page:
To go to the Spreadsheet View (Mitigations) page, click the Mitigations radio button on the top of the page. (Figure 1)
The option for navigation from one page to another is placed on top of the page and is shown in Figure 1.
Steps:
- Risk Register —> Spreadsheet View
- Click the Threats radio button (Figure 1) to navigate to the Spreadsheet view (Threats) page.
Or
Click the Opportunities radio button (Figure 1) to navigate to the Spreadsheet view (Opportunities) page.
There is also an option to view the mitigation for Threat/Opportunity.
To view the Spreadsheet View (Mitigations) for threat, select Threat from the dropdown. (Figure 1)
To view the Spreadsheet View (Mitigations) for opportunity, select Opportunity from the dropdown. (Figure 1)
The Spreadsheet View (Mitigations) page is divided into two parts, Mitigation Spreadsheet (Figure 1) and Mitigation Mapping (Figure 2).

Figure 2
In the Mitigation Map Information part, the Risk IDs mapped to a corresponding mitigation step is shown in one field separated by commas. The user can click this Risk ID field and get a pop up similar to that in the risk to activity mapping from the detailed view, where we can map the risks to the mitigation step or unmap the risks from the mitigation. (Figure 3)
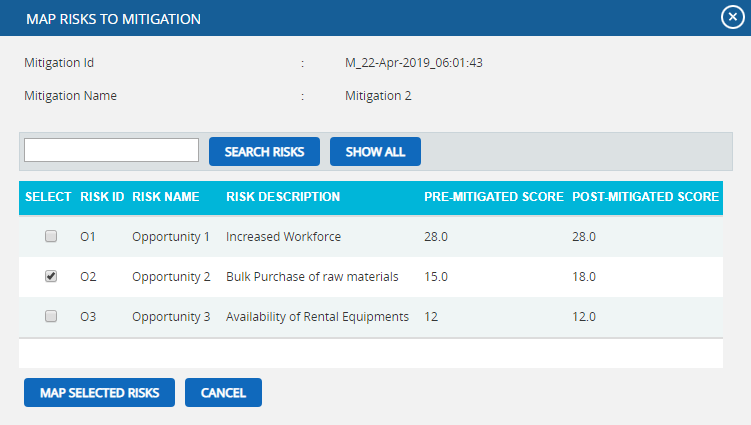
Figure 3
Steps:
- Risk Register —> Risk Spreadsheet—> Mitigations —> Mitigation Map Information
- Click the link in the Risk ID column for each mitigation step (Figure 2).
- A pop up appears in which the user can select the risks to be mapped by checking the checkboxes or uncheck the selected risks to remove mapping and click the OK button. (Figure 3)
- Click the Cancel button to close the pop up. (Figure 3)
Save All:
The Save All button is to save all the changes done in the Mitigation Spreadsheet and Mitigation Mapping pages when the Auto Save is OFF.
Steps:
- Risk Register —> Risk Spreadsheet —> Mitigation Spreadsheet/ Mitigation Mapping
- Select the Auto SAVE Off option from the dropdown. (Figure 4)
- Give the necessary changes in the Mitigation Spreadsheet / Mitigation Mapping pages and click Save All button to save all the changes done. (Figure 2 and Figure 4)
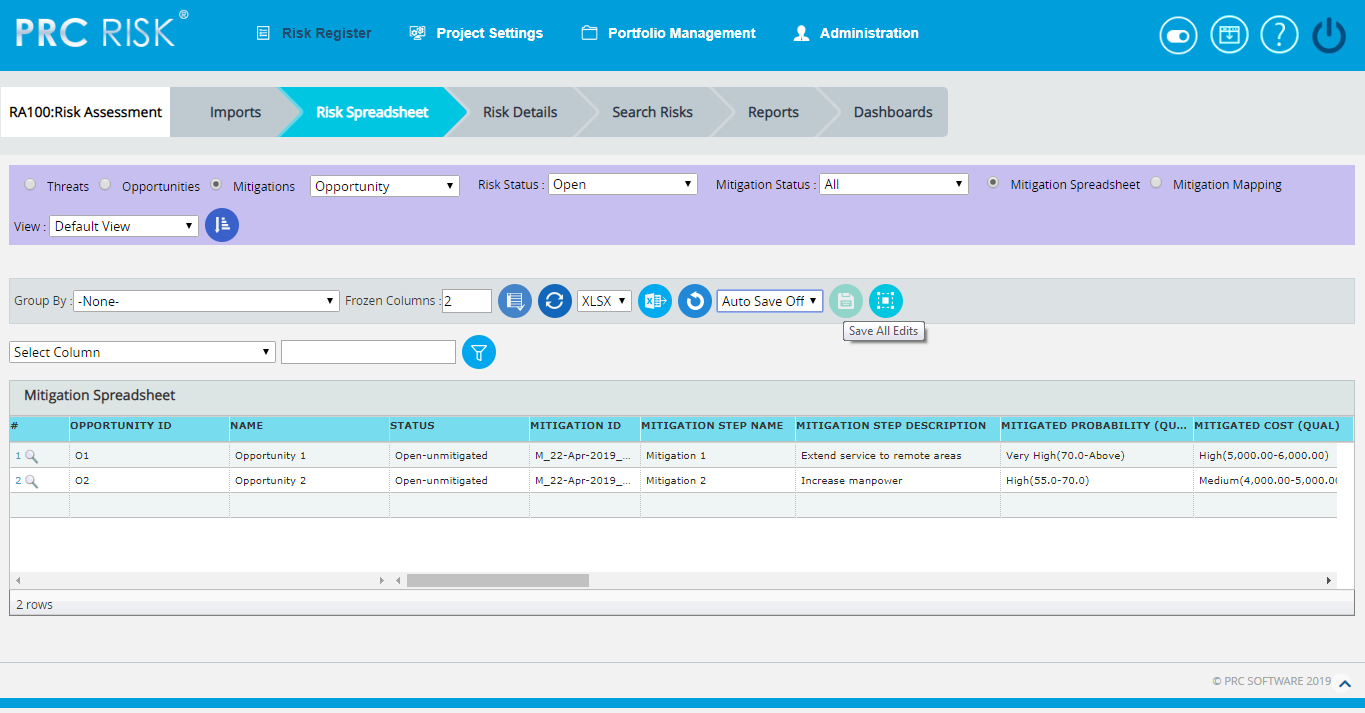
Figure 4
In the Mitigation Spreadsheet part, each Risk ID is on a separate row so that the Mitigation IDs may be repeated. Here the scoring can be viewed in different ways by Group By functionality. (Figure 3)
Group by:
This functionality is to view the scoring in different ways based on each fields in the Mitigation Spreadsheet, i.e. Risk ID, Risk Name, Risk Status, Mitigation ID etc. The default view will be No grouping.
Steps:
- Risk Register —> Risk Spreadsheet—> Mitigations —> Mitigation Spreadsheet
- Click the Group By dropdown and select the required one from the list. (Figure 5)
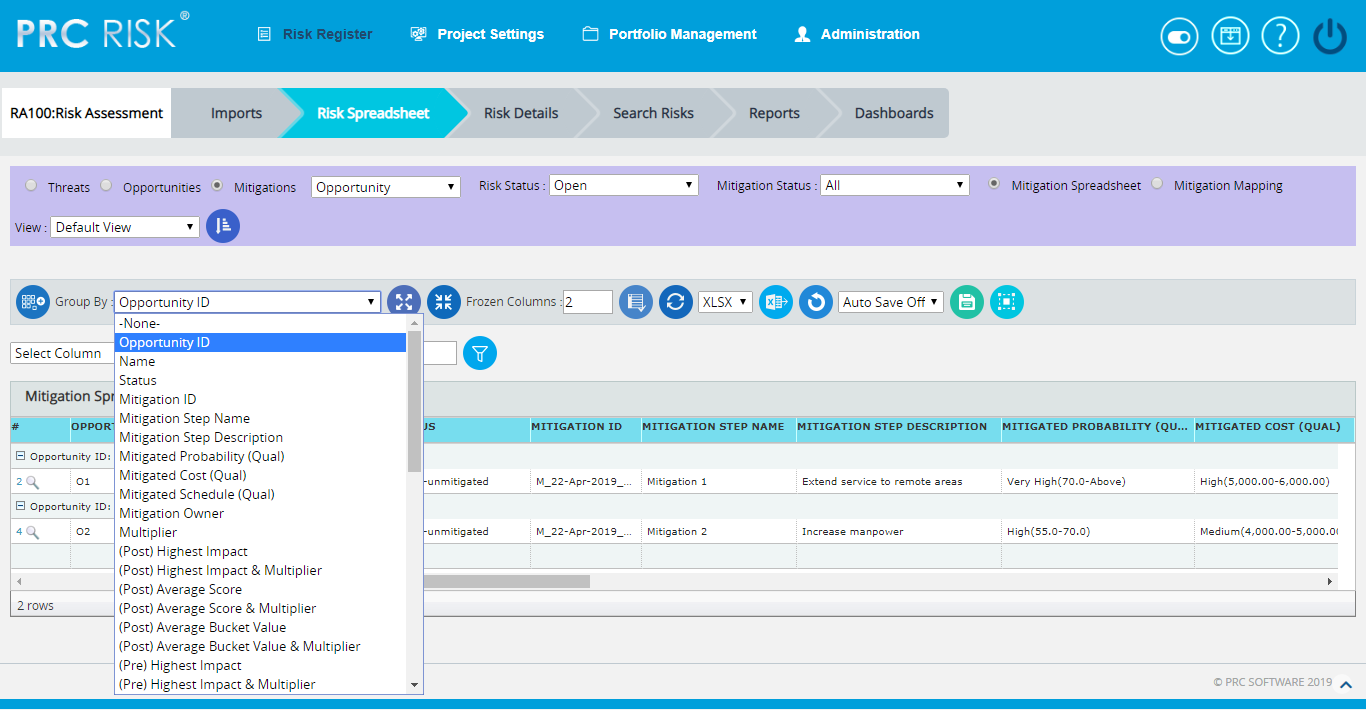
Figure 5
Ungroup to add new:
This functionality is to ungroup the grouped list and allows adding new mitigations.
Steps:
- Risk Register —> Risk Spreadsheet—> Mitigations —> Mitigation Spreadsheet
- Click the Group By dropdown and select the required one from the list. (Figure 5)
- Click the Ungroup To Add New button to ungroup the list and add the new mitigation. (Figure 5)
Collapse All:
This functionality is to collapse the mitigation score information based on the group selected from the Group By dropdown.
Steps:
- Risk Register —> Risk Spreadsheet—> Mitigations —> Mitigation Spreadsheet
- Click the Group By dropdown and select the required one from the list. (Figure 5)
- Click the Collapse All button to collapse the mitigation information. (Figure 6)
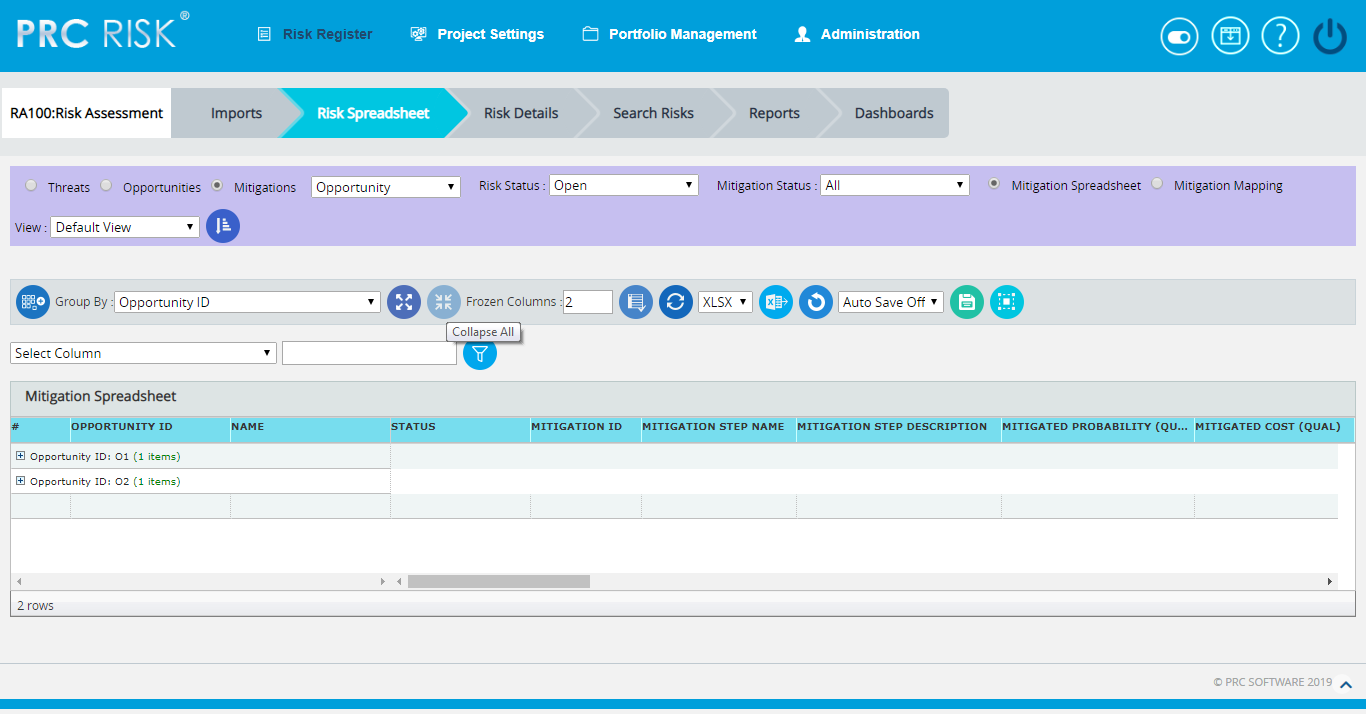
Figure 6
Expand All:
This functionality is to show the collapsed mitigation score information.
Steps:
- Risk Register —> Risk Spreadsheet—> Mitigations —> Mitigation Spreadsheet
- Click the Group By dropdown and select the required one from the list. (Figure 5)
- Click the Collapse All button to collapse the mitigation information. (Figure 6)
- Click the Expand All button to show the collapsed mitigation score information.
Export to Excel:
This functionality is used to export the entire page to Excel as .xlsx or .xls file type.
Steps:
- Risk Register —> Risk Spreadsheet—> Mitigations
- Click the Export button to export the entire page to Excel. (Figure 1)
Undo:
This functionality is used to reset the last saved value.
Steps:
- Risk Register —> Risk Spreadsheet—> Mitigations
- Click the Undo button to return to the last saved value. (Figure 1)
Risk Status:
This functionality is used to display the risk and its mitigation details based on the risk status whose value is open, closed or both.
Steps:
- Risk Register —> Risk Spreadsheet
- Click the Mitigation radio button and select threat/opportunity from the dropdown.
- Click the Mitigation Spreadsheet radio button.
- Click the Risk Status dropdown button and select open, close or both to display the mitigation details with particular risk status. (Figure 2)
Mitigation Status:
This functionality is to display the risks and its mitigation details based on the mitigation status whose value is open, closed, proposed, in progress, rejected, complete, risk closed or approved. (Figure 7)
Steps:
- Risk Register —> Risk Spreadsheet
- Click the Mitigation radio button and select threat/opportunity from the dropdown.
- Click the Mitigation Spreadsheet radio button.
- Click the Mitigation Status dropdown button and select open, closed, proposed, in progress, rejected, complete, risk closed or approved to display the mitigation details with particular mitigation status. (Figure 7)
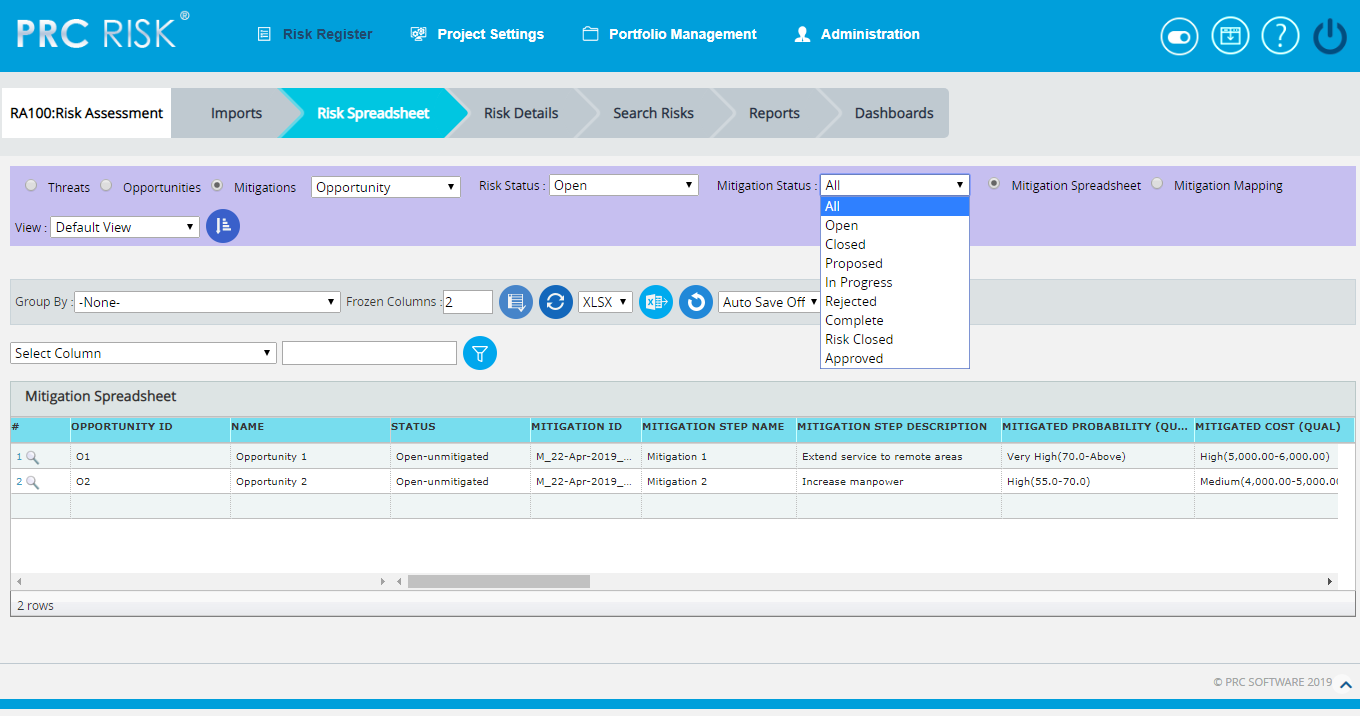
Figure 7
Delete mitigations:
Mitigations can be deleted by clicking the delete button corresponding to each row or multiple mitigations can be deleted simultaneously.
Delete multiple Mitigations:
This functionality helps to delete multiple mitigations simultaneously. To delete multiple mitigations the user must first select them.
Steps:
-
Risk Register —> Mitigations Spreadsheet
-
Click the Select Mitigations button to select the mitigation to delete. (Figure 1)
-
Select the mitigation by checking the checkboxes. (Figure 8)
-
Click the Delete Multiple button to delete the selected mitigations. (Figure 8)
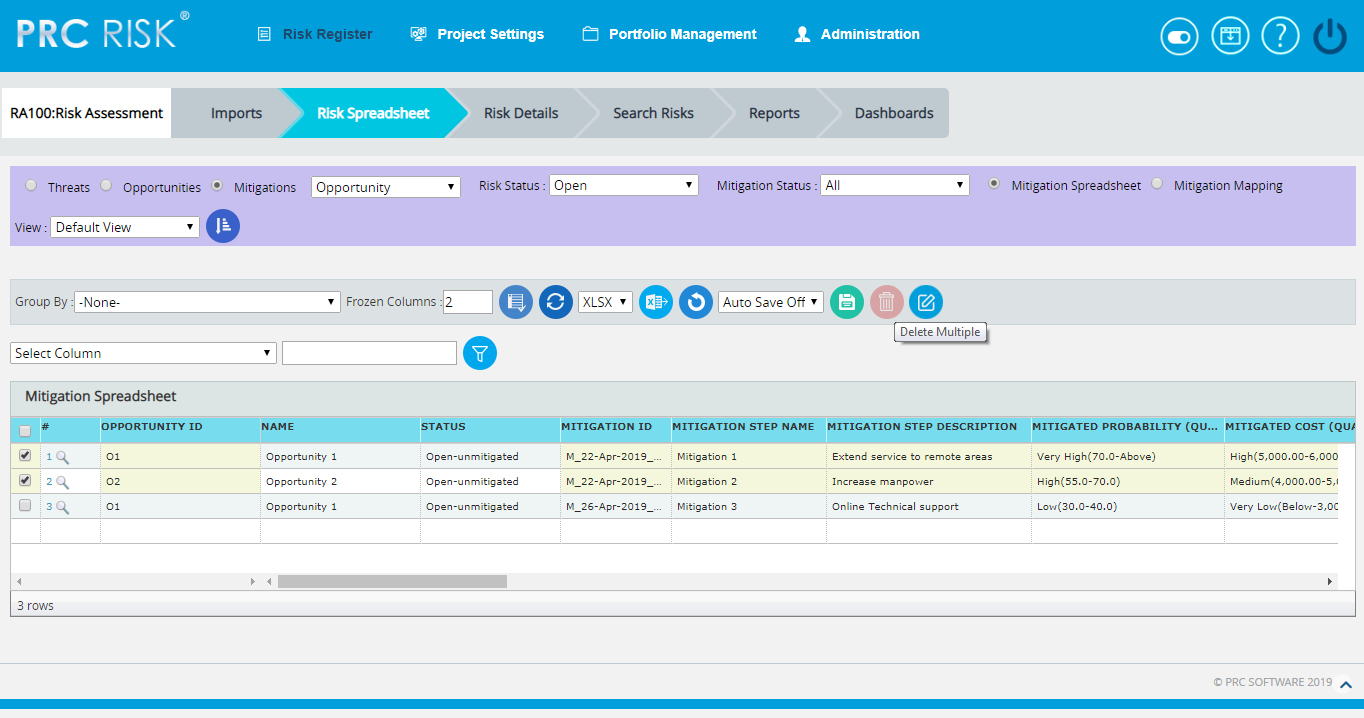
Figure 8
Delete mitigations individually:
To delete mitigations individually follow the steps described below.
Steps:
- Risk Register —> Mitigations Spreadsheet
- Click the Close button to delete the required mitigation.
Reorder Columns:
This functionality is used to arrange the required fields in particular order in which the risks are viewed in spreadsheet. The user can create, save & apply, delete and reset the column orders in mitigation spreadsheet. To set a selected order as default, check the Set as Default checkbox. The column order selected by default when no user defined column order exists is the Default Column Order which cannot be deleted. It can be edited by the user when necessary.
Steps:
- Risk Register —> Risk Spreadsheet —> Threats
- Click the Reorder Columns button to reorder the spreadsheet columns. (Figure 1)
- Select the required fields to be reordered from the Available Fields using Add & Remove buttons. (Figure 10)
- Click First, Up, Down or Last button to move the selected field to the required position.
- Click Save and Apply icon to save and apply the changes done. (Figure 10)
- Click Reset icon to reset the fields to the previous order. (Figure 10)
- Click Delete icon to delete the selected column order from the list. (Figure 10)
- The view selection can be shuffled using the dropdown to the left of Reorder Columns button. (Figure 9)

Figure 9
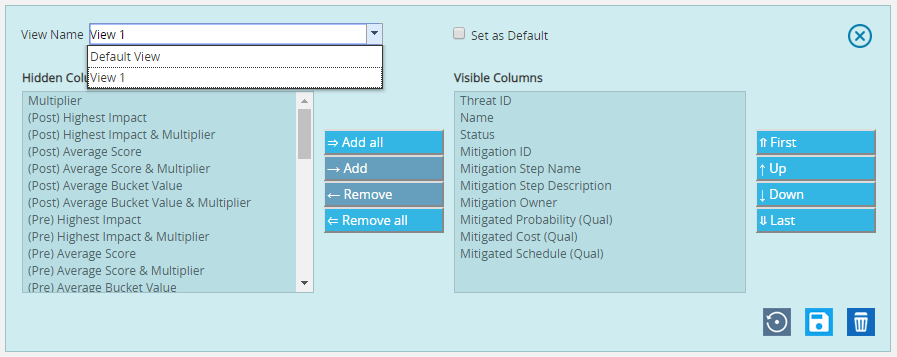
Figure 10
Frozen column:
This functionality is used to set the number of columns fixed when the scroll is enabled. For example, in Figure 6 Frozen Columns is set to 2 (default value), which implies that the column Risk ID and Risk Name will be fixed and scrolling will be applicable from the third column onwards.
![]()
Figure 11
Steps:
- Risk Register —> Risk Spreadsheet—> Mitigations
- Enter the number of columns that must be frozen.
- Click the Set button shown in Figure 11.
Filter Data:
To Filter the data according to a particular value:
Steps:
- Risk Register —> Risk Spreadsheet—> Mitigations
- Select the required column from the Select Column dropdown. (Figure 1 )
- Enter the value in the textbox based on which filtering is to be done. (Figure 1)
- Click the Filter button (Figure 1). The filtered data will be displayed.
Reset Data:
This functionality is used to set the filtered values to its previous values .
Steps:
- Risk Register —> Risk Spreadsheet—> Mitigations
- Click the Reset button to reset the values. (Figure 1)
Pre-Mitigated Score:
The Pre-Mitigated Score is the risk score. The fields (Probability, Cost and Schedule and Additional Impacts) are used to set the pre-mitigated score. (Figure 1) If Probability and Impacts have a value Undefined or No Risk, the Pre-Mitigated Score will be zero.
Mitigated Risk Score:
The fields (Probability, Cost and Schedule and Additional Impacts) are used to set the Mitigated Risk Score. (Figure 1) If Probability and Impacts have a value Undefined or No Risk, the Mitigated Risk Score will be zero.
Creating New Mitigation:
Creating a new mitigation in Spreadsheet View is quick and easy.
Steps:
-
-
Risk Register —> Risk Spreadsheet—> Mitigations
-
Select Risk ID from the Risk ID dropdown. The Risk Name and Pre-Mitigated Score are displayed automatically. (Figure 1)
-
Enter the details on a new line. For fields such as Name, Description etc., a textbox pops up upon clicking the cell. (Figure 12) After entering the details, click the Save button for text fields (Figure 12). The details will be saved automatically. To cancel, click the Cancel button. (Figure 12).
-

Figure 12
A calendar component pops up for date fields upon clicking the calendar control. (Figure 13)
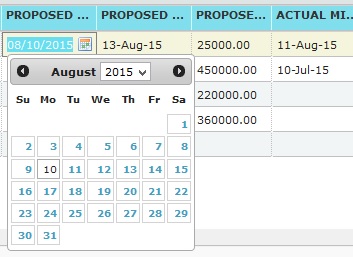
Figure 13
If the data is to be selected from a list, a dropdown box appears. (Figure 14)
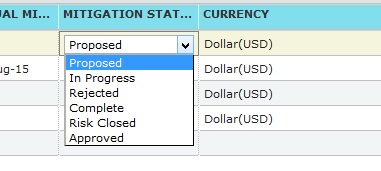
Figure 14
The other columns may be edited within the cell.
4. Click any other cell to trigger the Auto Save.
Edit Mitigations:
Mitigations can be edited individually by clicking the cells which need to be edited corresponding to each row or multiple mitigations can be edited simultaneously with repeating cell values.
Edit Multiple Mitigations:
This functionality helps to edit multiple mitigations simultaneously with cells of same entries. To edit multiple mitigations we must first select them.
Steps:
- Risk Register —>Risk Spreadsheet —> Mitigations
- Click the Select Mitigationsbutton to select the opportunities to edit. (Figure 1)
- Select the threats by checking the checkboxes. (Figure 15)
- Click the Edit Multiple Mitigations button to edit the selected mitigations.(Figure 15)
- Select the column, enter the values to be edited and click the SAVE button in the EDIT MULTIPLE MITIGATIONS VALUE pop up that appears. (Figure 16)
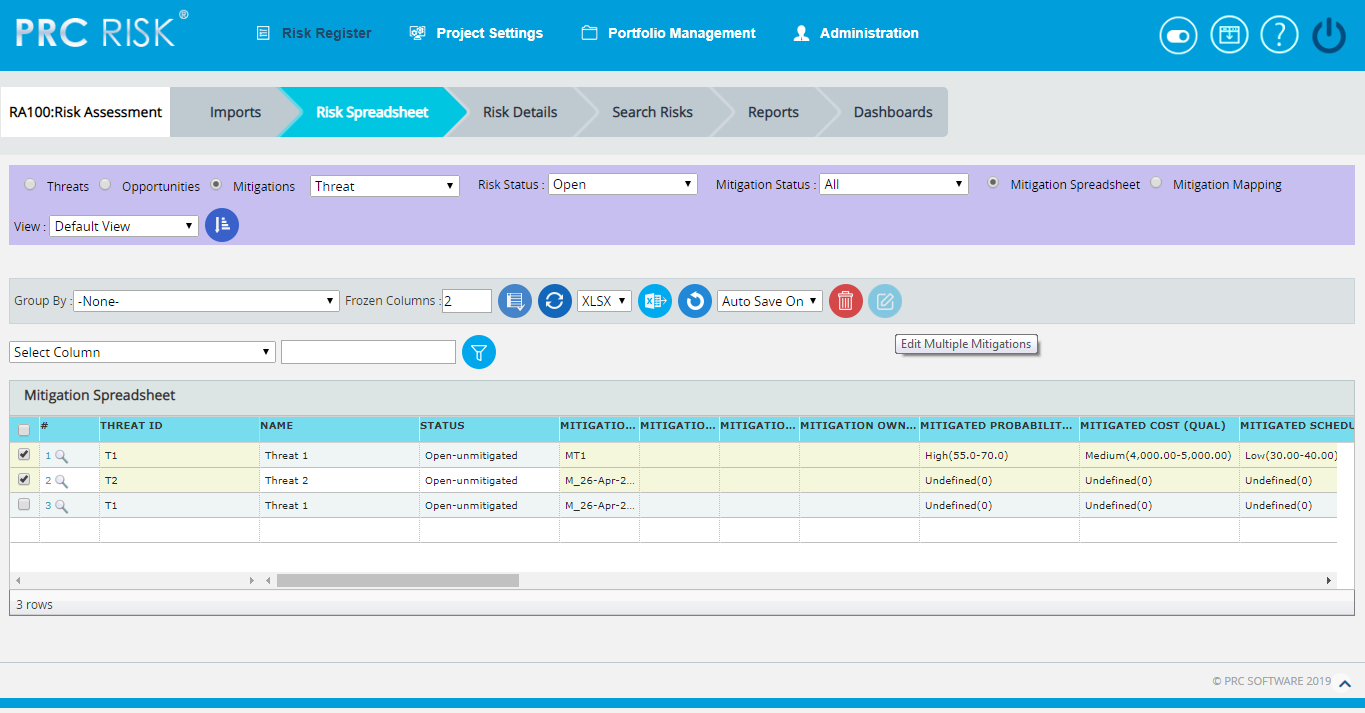
Figure 15
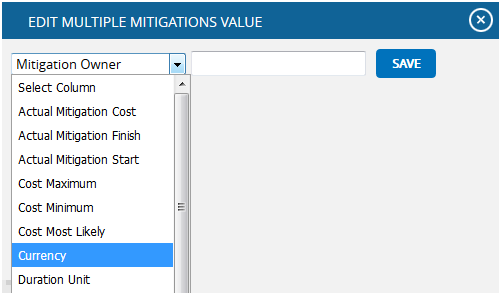
Figure 16
Edit Mitigations Individually:
This functionality is to edit the cells of an individual Mitigation.
Steps:
- Risk Register —>Risk Spreadsheet —> Mitigations
- Refer to the procedures in the previous section (Creating a new Mitigations).
- Edit the cell as required and click in any other cell to trigger the Auto Save.
User Defined Fields:
The user defined or custom field is shown along with the mitigation details as the last column. There is no limit to the number of user defined fields.
User Defined Fields can be added in two ways.
- The User Defined Fields can be added using the template imported from the Portfolio Management page for the project:
Project Settings —> Import from Templates
Or
- It can also be added from the page:
Project Settings —> Custom Fields
Formula Fields:
The Formula Field is shown along with the mitigation details as the last column.There is no limit to the number of Formula Fields.
Formula Fields can be added in two ways.
- The Formula Fields can be added using the template imported from the Portfolio Management page for the project:
Project Settings —> Import from Templates
Or
- It can also be added from the page:
Project Settings —> Custom Fields
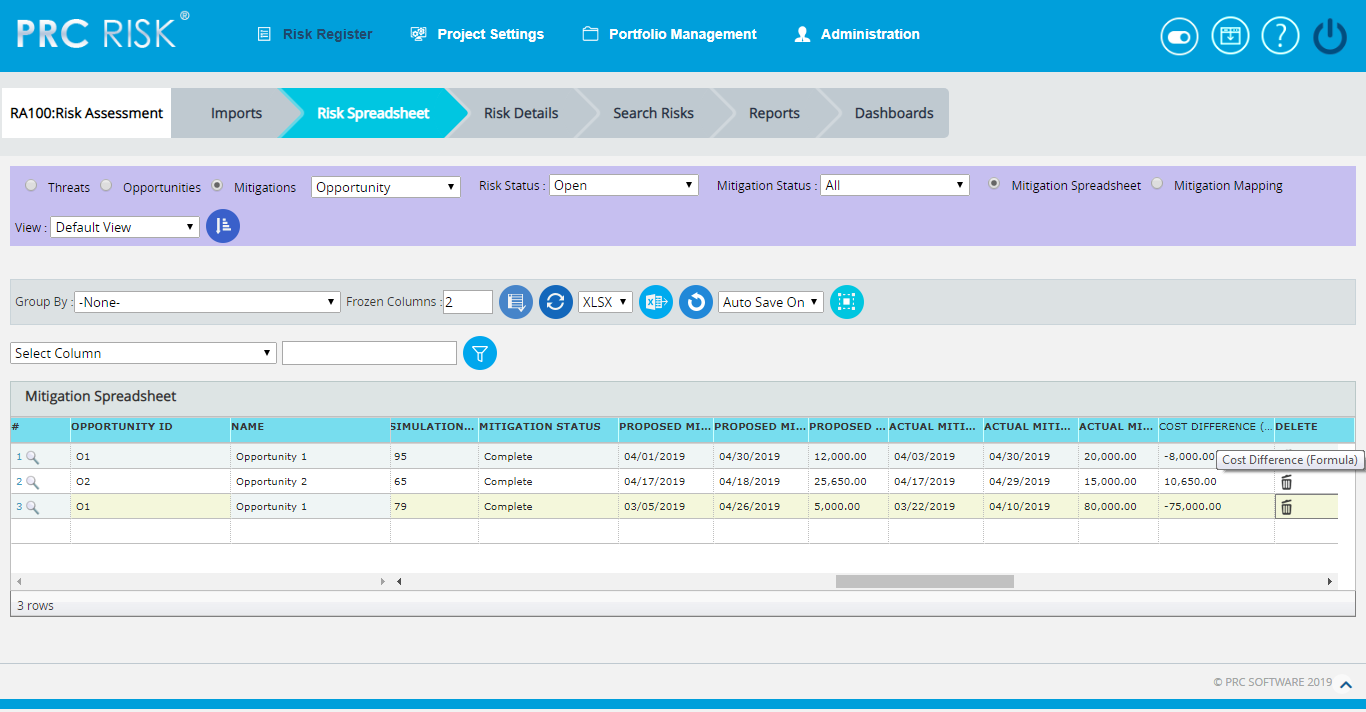
Figure 17