The Project Management section can be viewed only by those users who have either Read/Write or View Access. Users with Read/Write access can create new projects, edit projects, add users to a selected project, delete a project, remove a user, and change the access privileges of users added to the selected project. Whereas, View Access enables users to view project data but blocks the ability to alter existing data or add new data. View Access users can select a project, view project details and view users assigned to the project.
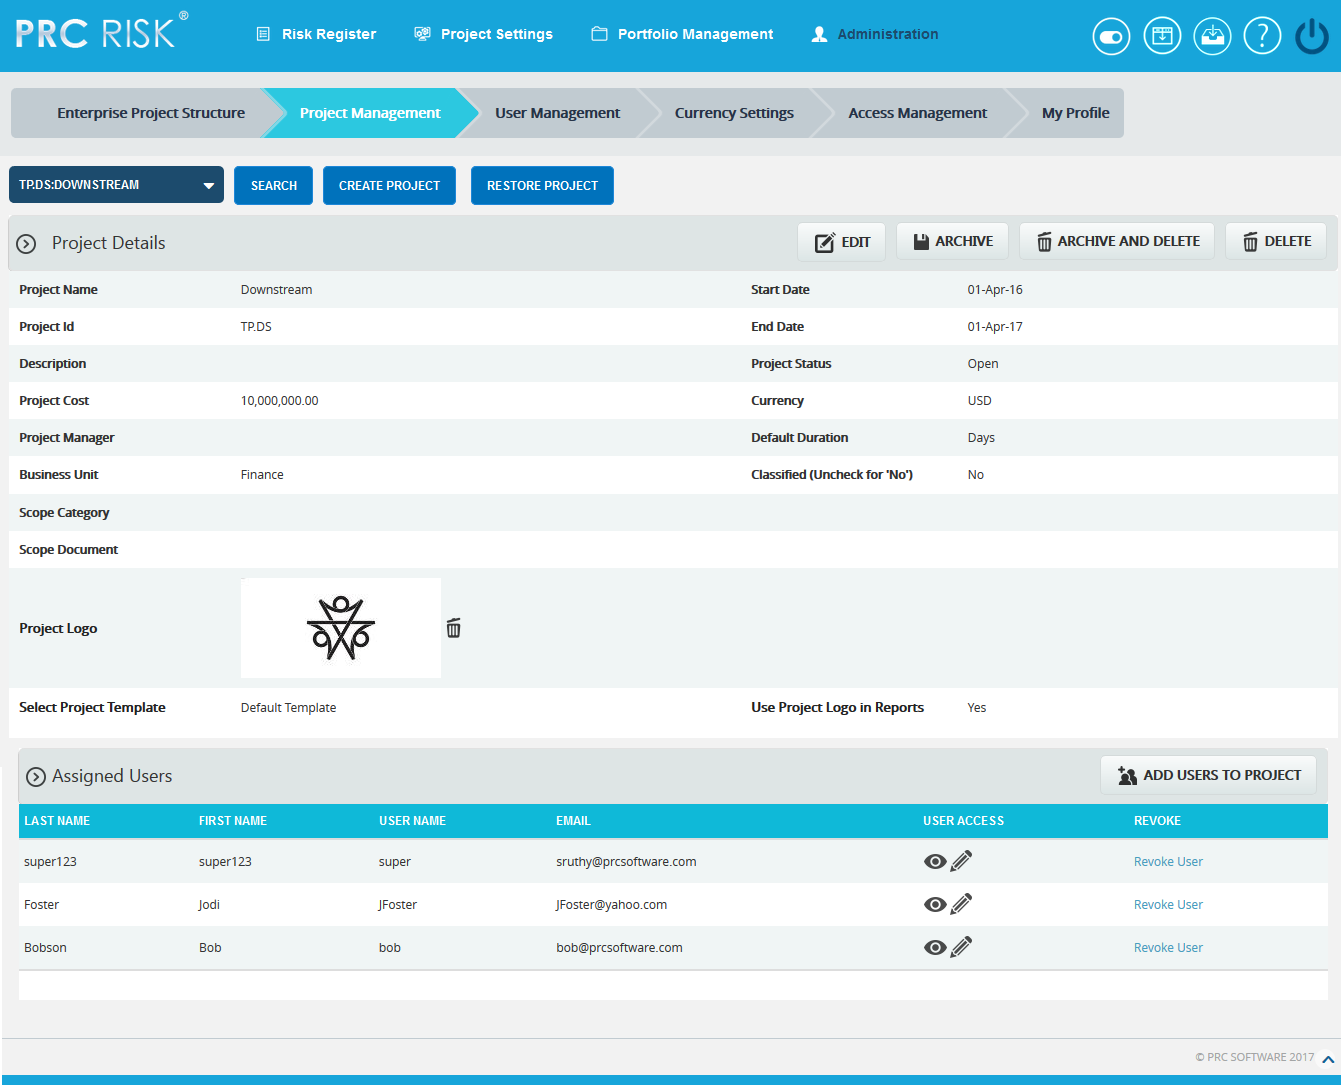
Figure 1
The project manager field has an editable select box which enables the user to either select or enter the details. When the page is loaded for the first time, the currency field displays the application’s default currency, which is specified in the My Profile page. The user can edit the currency by changing the selection on the Currency dropdown.
Searching For projects:
Searching for projects in the PRC Enterprise Risk Register can be done in a couple of ways. The Search function allows the user to search for a project based on a keyword. This method is faster when working with a large amount of data. The Select function is commonly used for smaller databases or when the search criteria can easily be defined.
Using the search function:
Steps:
-
- Administration —> Project Management
- Click the SEARCH button. (Figure 1)
- Enter the project name or Id and click the SEARCH button. (Figure 2)
- Administration —> Project Management
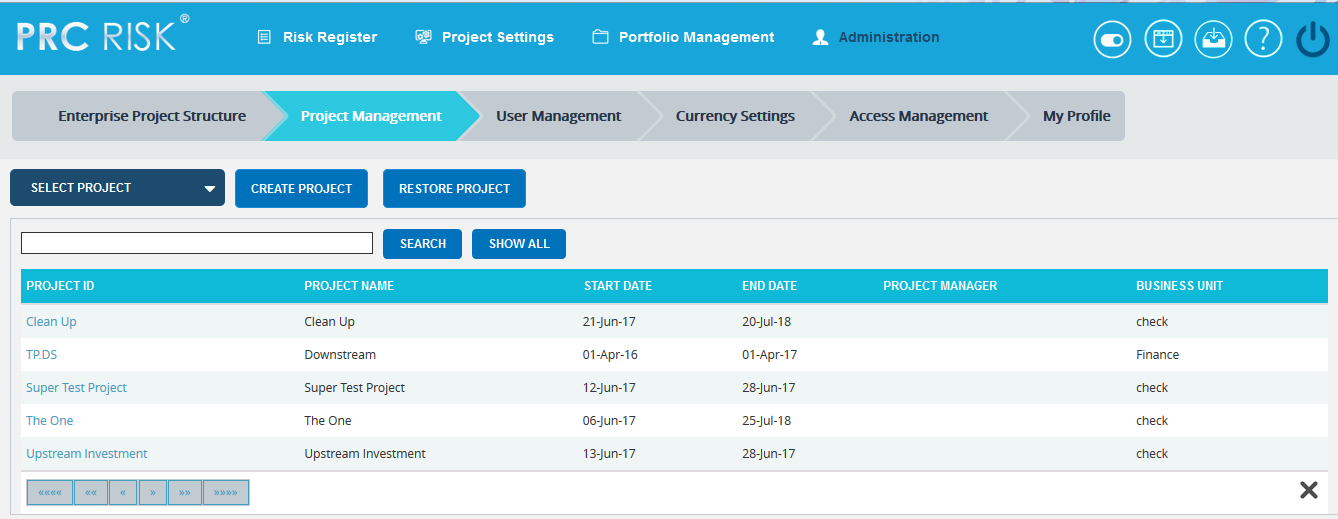
Figure 2
The SHOW ALL button in the search area lists all the projects available. (Figure 2)
Using the select function (dropdown list):
Steps:
- Administration —> Project Management
- Click the SELECT PROJECT dropdown. (Figure 1)
- Select the required project.
Creating a new project:
It is important to enter as much information as possible about the project when a new project is created. A field, such as the Business Unit field, will be used later for Breakdown Structure creation and mapping. Projects can also be listed as Classified, which means they are hidden to all users except those assigned to it.
Steps:
- Administration —> Project Management
- Click the CREATE PROJECT button. (Figure 1)
- After entering the project data, click the SAVE button.
Editing project information:
When editing a project, all the fields are unlocked and user can modify all the project details.
Steps:
- Administration —> Project Management
- Click the EDIT button. (Figure 1)
- After the data is modified, click the SAVE button. (Figure 3)
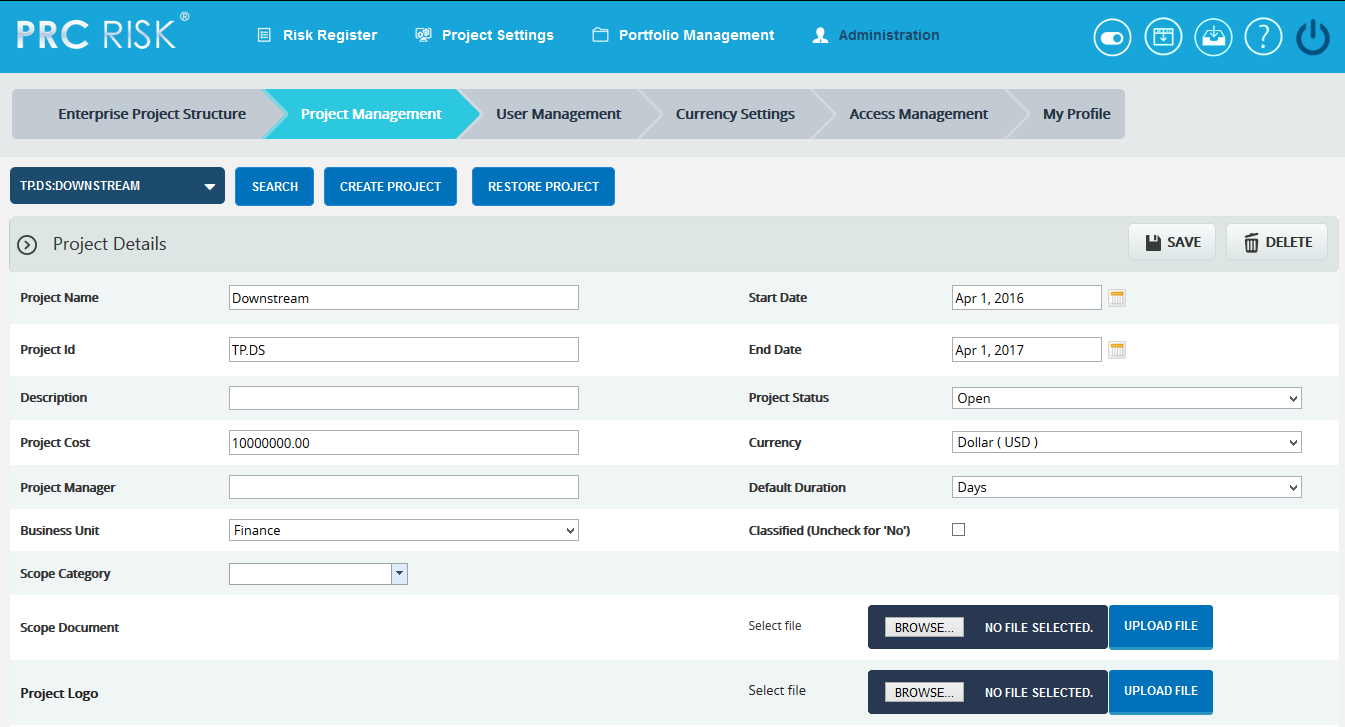
Figure 3
Project Logo:
This functionality is used to upload the project logo for the selected project. This logo is shown in the Risk Register Word and PowerPoint file exports, only if Use Project Logo in Reports checkbox is checked.
Steps:
- Administration —> Project Management
- Select the required project.
- Click the EDIT button. (Figure 1)
- Click the BROWSE button in the Project Logo and select the required image file. (Figure 3)
- Click the UPLOAD FILE button to finish and click the SAVE button.
- Click the Delete next to the image uploaded to delete the project logo. (Figure 1)
Import Project Schedule:
This functionality is used to import schedule ID(s) in order to map values for the Link to Schedule ID(s) field, in the Risk Details page in Risk Register. A sample sheet used for import is shown in Figure 4.
Steps:
- Administration —> Project Management
- Select the required project.
- Click the EDIT button. (Figure 1)
- Click the BROWSE button in the Import Project Schedule and select the required file. (Figure 3)
- Click the UPLOAD FILE button to finish.
- After the file is uploaded, map the task name and task code fields and click the SAVE button. (Figure 3)
- Click the Clear File button to remove the imported file. (Figure 5)
To delete the schedule IDs not mapped for any threats/opportunities in the project, use the Click Here to Delete any Unmapped Schedule IDs link shown in Figure 5.
![]()
Figure 4
Add users to Project:
This functionality helps to assign a user to the selected project.
Steps:
-
- Click the ADD USERS TO PROJECT button. (Figure 1)
- A pop up appears from which the user can be searched and selected. (Figure 5)
- SEARCH button is used to search the users who have been assigned to the project. The SHOW ALL button lists all users. If no user is added to the selected project, click the CANCEL button. (Figure 5)
- Click NEXT STEP. A pop up appears from which user accesses can be set. (Figure 6)
- After modifying the accesses, click the FINISH button to save the changes. (Figure 6)
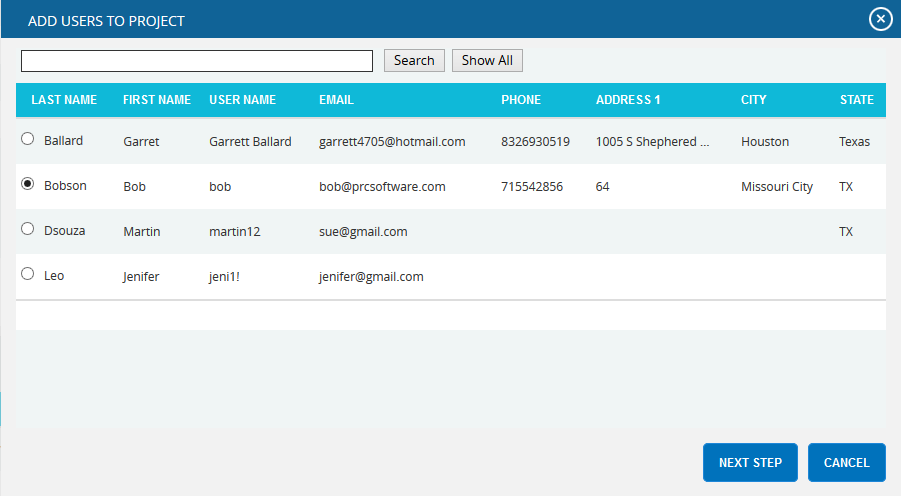
Figure 5
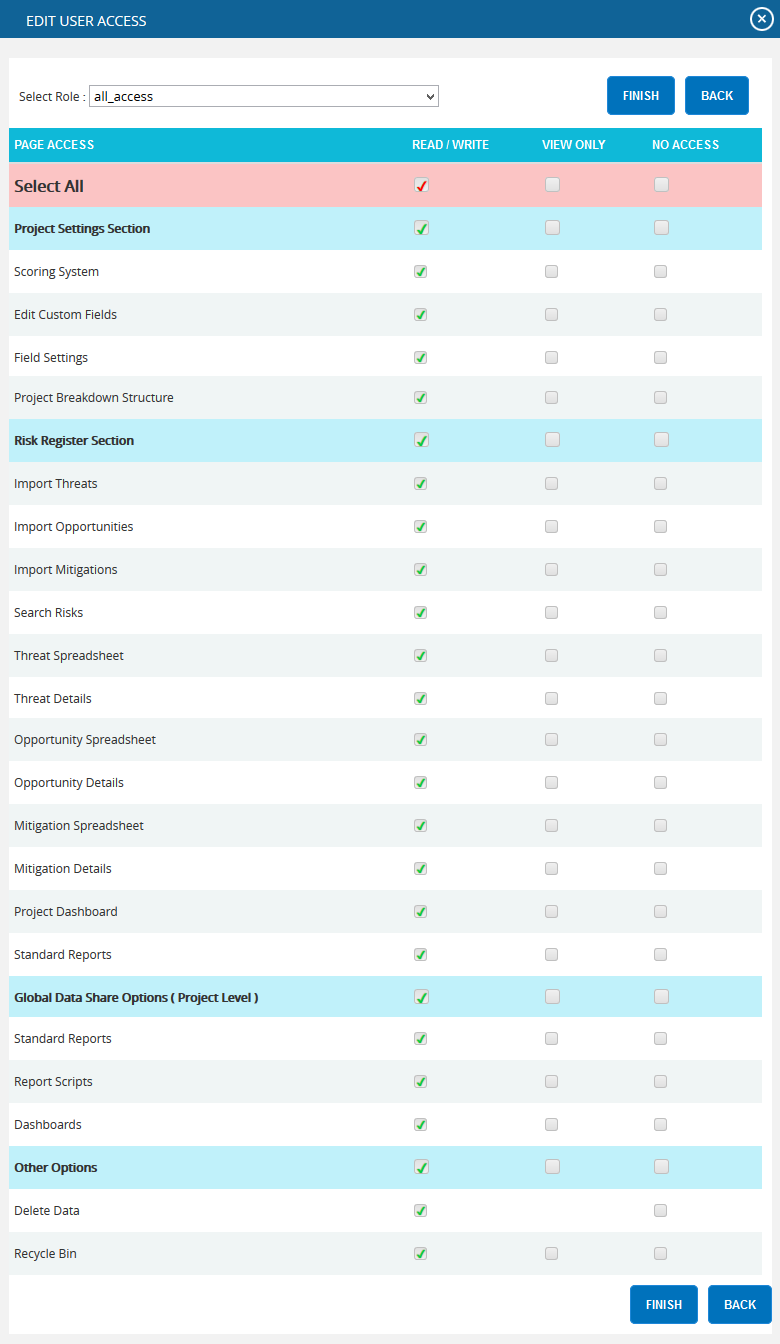
Figure 6
View/Edit Accesses:
To modify the accesses of a user assigned to a project, click View/Edit (Figure 7). A pop up (Figure 8) appears and after modification, click the Finish button to save the changes. (Figure 8)

Revoke user:
In order to remove a user assigned to a project, click Revoke User (Figure 7) under Assigned Users section.
Deleting projects:
When deleting projects, the PRC Enterprise Risk Register will remove the project and delete any links it has to the system. Deleted projects will be accessible in the Historical Database.
This button is visible only to the Super User having Read/Write access for delete function.
Steps:
- Administration —> Project Management
- Select the required Project.
- Click the DELETE button. (Figure 1)
After the user receives the confirmation message, click the OK button. The project is then removed from the system.
Deleting and Archiving Projects:
When deleting and archiving projects, the PRC Enterprise Risk Register exports the project for future use. That is, all the details of the project such as template information, mapped users, risk details and mitigation added to risks are saved with the project and remove the project. The file is saved with .prcriskx extension.
Steps:
- Administration —> Project Management
- Select the required Project.
- Click the DELETE AND ARCHIVE button. (Figure 1) The user receives the confirmation message (Figure 9), click the OK button. The project is then saved and removed from the system.
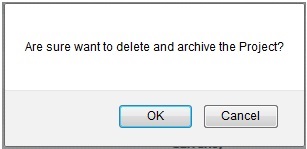
Figure 9
Archiving Project:
When archiving projects, the PRC Enterprise Risk Register exports the project for future use. That is, all the details of the project such as template information, mapped users, risk details and mitigation added to risks are saved with the project.
Steps:
- Administration —> Project Management
- Select the required Project.
- Click the ARCHIVE button. (Figure 1)
Restoring Project:
The Restore Project functionality allows the user to restore a previously archived project. All the details of the project along with the template information, mapped users, risk and mitigation details, etc are imported. The accepted file type is .prcriskx .
Steps:
- Administration —> Project Management
- Select the required Project.
- Click the RESTORE PROJECT button. (Figure 1) A pop up appears. (Figure 10)
- Click BROWSE button to browse .prcriskx file and click UPLOAD FILE button. (Figure 10)
- A pop up appears (Figure 11). Map the archived users with the existing users.
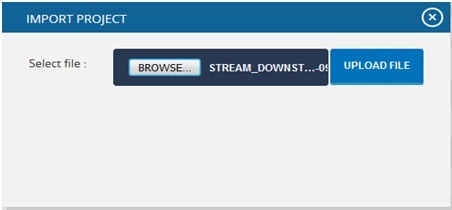
Figure 10
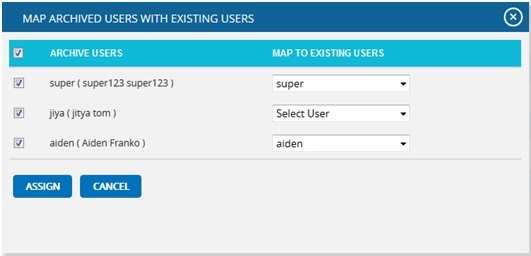
Figure 11