The Portfolio Breakdown Structure page allows the user to setup an Enterprise and Business Unit Level Breakdown Structure. The user can view, import, or manually create a breakdown structure by using the action links in each section. By using the dropdowns in the Portfolio Breakdown Structure page, the user can view the Breakdown Structures for different Business Units/Enterprise level. This page is visible only to those users who have Read/Write access or View access for Portfolio Breakdown Structures. Users with Read/Write access can create, edit, import and delete the Organizational Breakdown Structure, Work Breakdown Structure and Risk Breakdown Structure for enterprise level and business unit level. Users designated with View access can only view the Breakdown Structures for business unit and enterprise levels.
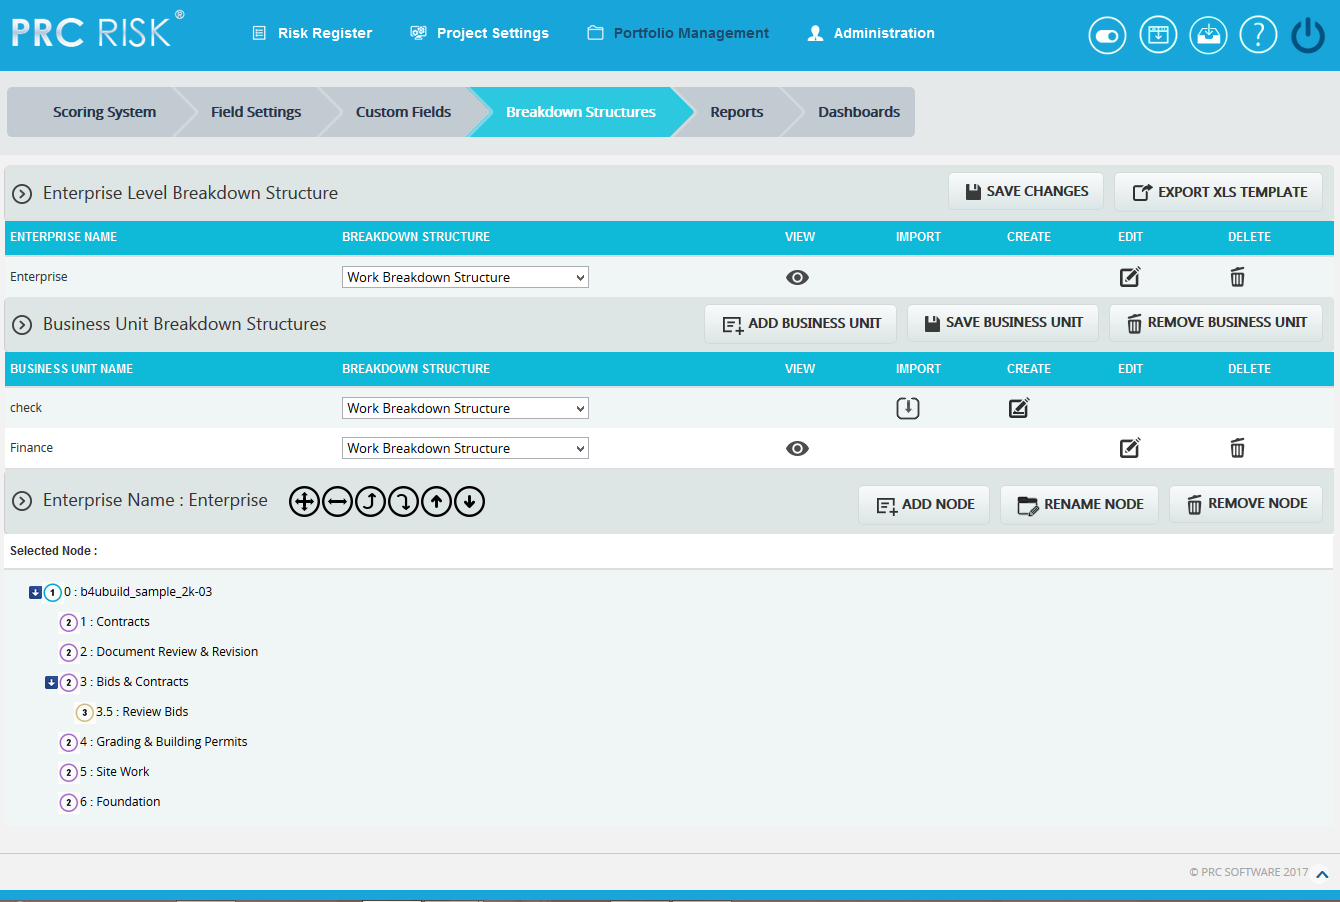
Figure 1
Breakdown Structure:
There are three main breakdown structures: Organizational Breakdown Structure, Work Breakdown Structure and Risk Breakdown Structure. These breakdown structures can be viewed, created, imported, edited and deleted. Each of these functions is explained below in detail.
View:
This functionality is used to view a Breakdown Structure. The steps described below apply to both enterprise and business unit level.
Steps:
- Portfolio Management —> Breakdown Structures
- Select the corresponding breakdown structure from the Breakdown Structure dropdown. (Figure 1)
- Click the corresponding View icon. (Figure 1)
Import:
This functionality is used to Import WBS/OBS/RBS. The steps described below apply to both enterprise and business unit level. This functionality is visible only if no node has been added to the breakdown structure.
Steps:
-
Portfolio Management —> Breakdown Structures
-
Select the corresponding breakdown structure from the Breakdown Structure dropdown. (Figure 1)
-
Click the IMPORT icon. (Figure 1) A pop up appears. (Figure 2)
-
Click the Choose File button. Select the required file (csv, xer, mpp, xls). (Figure 2)
-
Click the UPLOAD FILE button to finish. (Figure 2)
Sample sheet used for import:
| WBS code | Description | Outline Level |
| A | ABC123 |
1 |
| B | ABC124 |
2 |
| C | ABC125 |
2 |
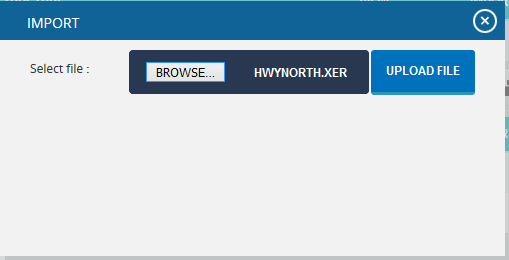
Figure 2
Export XLS template:
This functionality is to get a sample XLS file for importing to the breakdown structures.
Steps:
- Portfolio Management —> Breakdown Structures
- Click the EXPORT XLS TEMPLATE button. User will get a sample template on excel. (Figure 3)
Sample excel template:

Figure 3
Create:
This functionality helps to create a breakdown structure manually using the tree structure. This is applicable to both enterprise and business unit. This functionality is visible only if no node has been added to the breakdown structure. To create a breakdown structure, click the Create icon. (Figure 1) To add nodes, click the ADD NODE button (Steps are described in detail in Add Node section). (Figure 1)
Edit:
This functionality is used to edit the tree structure. The User can perform operations such as add, remove, rename, expand, collapse, promote, demote, and change the orders of the nodes.
Steps:
- Portfolio Management —> Breakdown Structures
- Click the EDIT icon to edit the tree structure. (Figure 1)
Add Node:
This functionality is used to add a new node.
Steps:
- Portfolio Management —> Breakdown Structures
- Click the EDIT link to edit the tree structure. (Figure 1)
- Click the ADD NODE button. (Figure 1) A pop up appears. (Figure 4)
- Enter the node Name and Code.
- Click the SAVE button to save the details. (Figure 4)
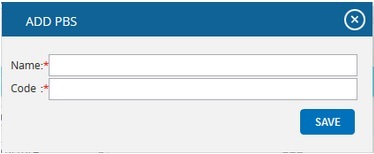
Figure 4
Remove node:
This functionality removes a node from the tree structure.
Steps:
- Portfolio Management —> Breakdown Structures
- Click the EDIT icon to edit the tree structure. (Figure 1)
- Select a node.
- Click the REMOVE NODE button. The node is removed from the system. (Figure 1)
Rename node:
This functionality is used to rename an existing node.
Steps:
- Portfolio Management —> Breakdown Structures
- Click the EDIT icon to edit the tree structure. (Figure 1)
- Select a node.
- Click the RENAME NODE button. (Figure 1) A pop up appears. (Figure 4)
- Rename the fields needed.
- Click the SAVE button to save the details. (Figure 4)
Expand nodes:
This functionality is used to expand all the nodes under the tree structure.
Steps:
- Portfolio Management —> Breakdown Structures
- Select a node.
- Click the Expand All icon to expand all the nodes. (Figure 6) Upon Expansion, the tree structure will be displayed as shown in Figure 5.
Collapse Nodes:
This functionality is used to collapse the expanded nodes as shown in Figure 6.
Steps:
-
Portfolio Management —> Breakdown Structures
-
Select a node.
-
Click the Collapse All icon shown in Figure 5. The nodes are collapsed and the tree structure will be displayed as shown in Figure 6.
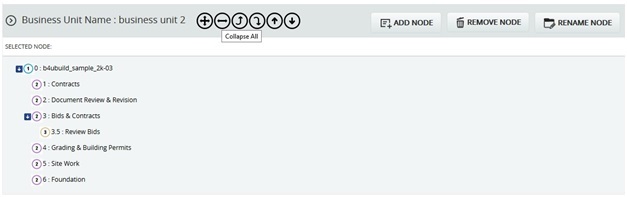
Figure 5

Figure 6
Promote nodes:
This functionality makes the level of the child node the same as that of the immediate parent. For example, consider the node 6: Foundation (Figure 7) which is a child of the node 5: Site Work. When promoted, 6: Foundation is on the same level as 5: Site Work (Figure 8). A node cannot be promoted if it does not have a parent.
Steps:
-
- Portfolio Management —> Breakdown Structures
- Click the EDIT icon to edit the tree structure. (Figure 1)
- Select a node.
- Click the Promote icon to promote the node.

Figure 7
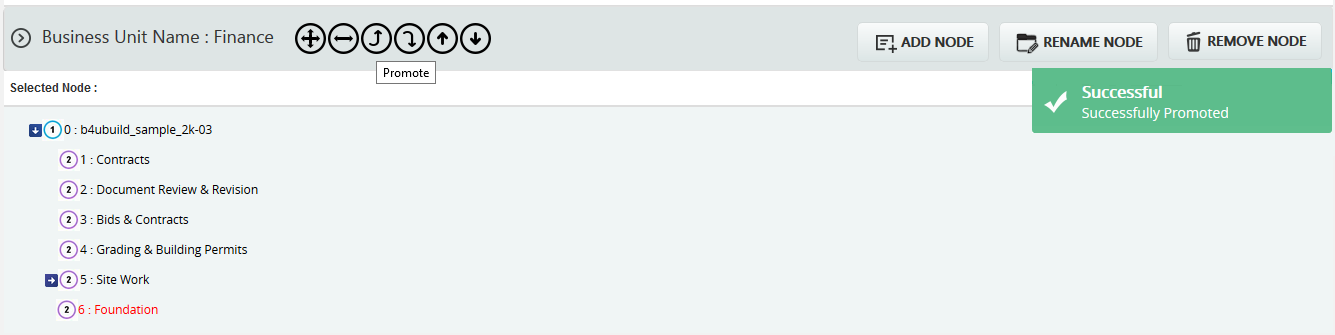
Figure 8
Demote nodes:
When a node is demoted it becomes the child of the node which is of same level and which lies just below it. For Example, consider the node 4: Grading & Building Permits (Figure 8), which is of the same level as the node 2: Document Review & Revision. When 4: Grading & Building Permits is demoted, it becomes a child node of the node 2: Document Review & Revision. (Figure 9) A node cannot be demoted if there is no other node of same level as the node selected.
Steps:
-
Portfolio Management —> Manage Breakdown Structures
-
Click the EDIT icon to edit the tree structure. (Figure 1)
-
Select node.
-
Click the Demote icon to demote a node.
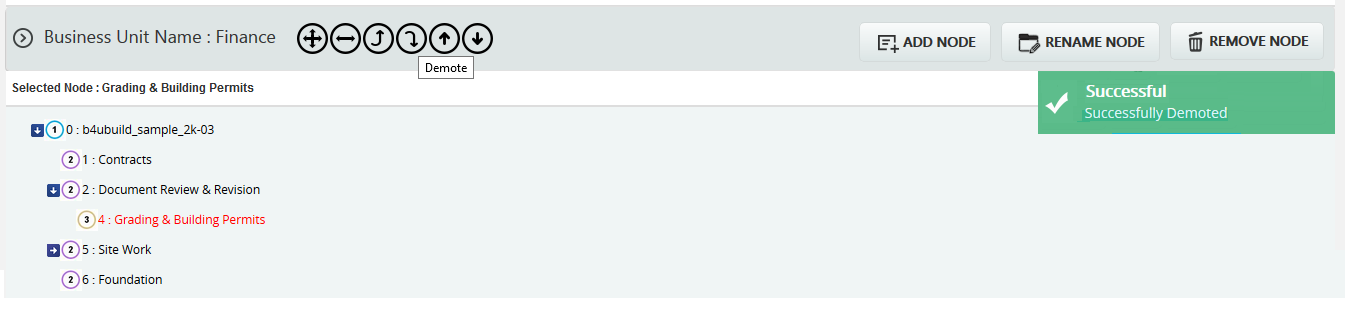
Figure 9
Up Order:
This operation is used to move a node up a level. It can be applied only to the nodes of the same level and this operation is not applicable for the first node. For example, consider the nodes 6: Foundation and 5: Site Work in Figure 9. The node 6: Foundation is located below the node 5: Site Work. When an Up Order operation is applied to the node 6: Foundation, it moves above the node 5: Site Work. Figure 10 shows the tree structure after the Up Order operation is applied.
Steps:
-
Portfolio Management —> Manage Breakdown Structures
-
Click the EDIT icon to edit the tree structure. (Figure 1)
-
Select node.
-
Click the Up Order icon to move up the node up the tree structure.
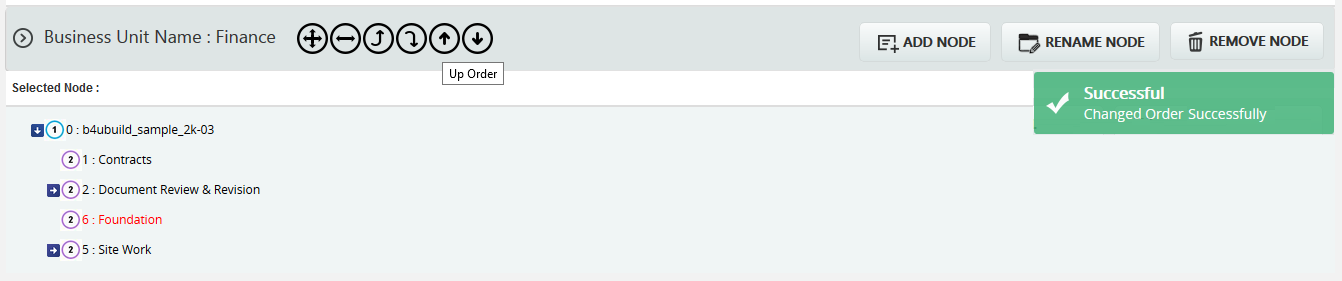
Figure 10
Down Order:
This operation is used to move a node down the tree structure. This can be applied only to nodes of the same level and this operation is not applicable for the last node. For example, consider nodes 1: Contracts and 2: Document Review & Revision in Figure 10. 1: Contracts is located above 2: Document Review & Revision in Figure 10. When a Down Order operation is applied to the node 1: Contracts, it comes below the node 2: Document Review & Revision. Refer to Figure 11, which shows the tree structure after a Down Order operation is applied.
Steps:
-
Portfolio Management —> Manage Breakdown Structures
-
Click the EDIT icon to edit the tree structure. (Figure 1)
-
Select the node.
-
Click the Down Order icon to move up the node down the tree structure.
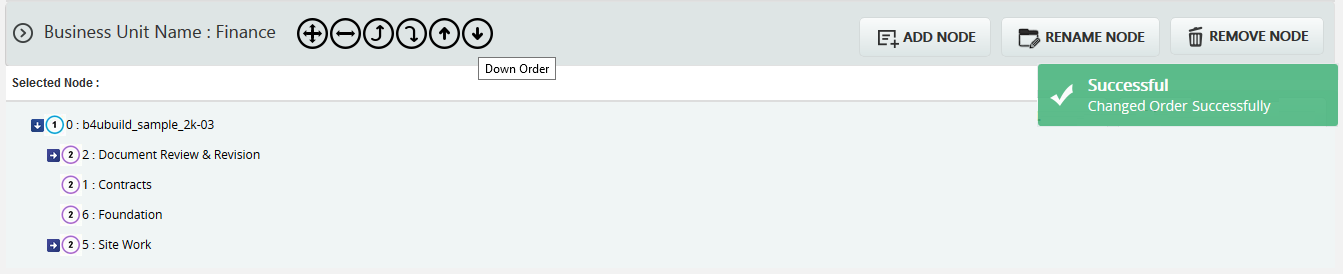
Figure 11
Delete:
This functionality is used to delete the selected breakdown structure from business unit and enterprise level. The steps described below apply to both enterprise breakdown structure and business unit breakdown structure.
Steps:
- Portfolio Management —> Manage Breakdown Structures
- Click the corresponding DELETE icon. (Figure 1)
- After you receive the confirmation message, click the OK button to delete the breakdown structure. To cancel, click the Cancel button.
Save Changes:
This functionality is used to save the Enterprise Name when its first added. To save the Enterprise Name, click the SAVE CHANGES button. (Figure 1)
Add business Unit:
This functionality is used to add a business unit.
Steps:
- Portfolio Management —> Manage Breakdown Structures
- Enter the business unit name.
- Click the SAVE BUSINESS UNIT button to save the Business Unit Name. (Figure 1)
Remove Business Unit:
This functionality is used to remove the business unit. Only those business units which are not assigned to any project can be removed.
There are two ways to remove a business unit. The first method is to delete multiple business units and the second is to delete them individually.
Delete Multiple Business Units:
Steps:
-
Portfolio Management —> Manage Breakdown Structures
-
Click the REMOVE BUSINESS UNIT button. (Figure 1) A pop up appears. (Figure 12)
-
Click the DELETE MULTIPLE button. (Figure 12)
-
Select the required business units by using the checkboxes provided. (Figure 13)
-
Click the DELETE button to delete the selected business units. (Figure 13)
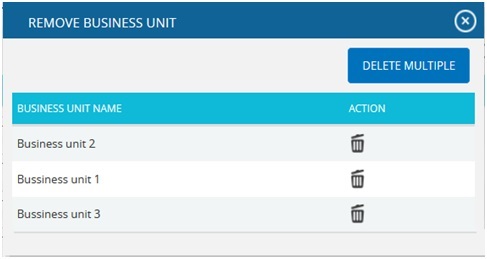
Figure 12
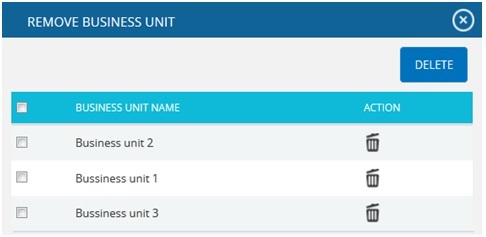
Figure 13
Delete Individually:
To delete the business units individually consider the following steps.
Steps:
-
Portfolio Management —> Manage Breakdown Structures
-
Click the REMOVE BUSINESS UNIT button. (Figure 1) A pop up appears. (Figure 12)
-
Click the corresponding Delete icon. (Figure 12)
-
After you receive the confirmation message, click the OK button. The business unit is now removed from the system. To cancel, click the Cancel button. (Figure 14)
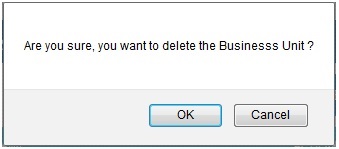
Figure 14